16/05/2014
Unboxing of the blower BL1200
.png)
You have just bought a Cifarelli blower model BL1200.
First of all I want to congratulate with you for the purchase: you bought a professional machine and if you will perform the proper maintenance, it will support you for a long time.
This article is not a guide for installation and use of the machine (for this purpose there is a use and maintenance manual); the article wants simply to illustrate what you’ll find when opening the package, with a short sequence of steps to install your blower.
When opening the box you will find the machine and its parts in the following position:
Remove the blower and everything that is inside of the box.
- Blower BL1200
- Elbow
- Flexible hose
- Throwing pipe with swivel
- Intermediate throwing pipe
- Final throwing pipe
- Spherical terminal
- Rectangular terminal
- Fuel mixing bottle
- Spanners bag
The spanners bag contains:
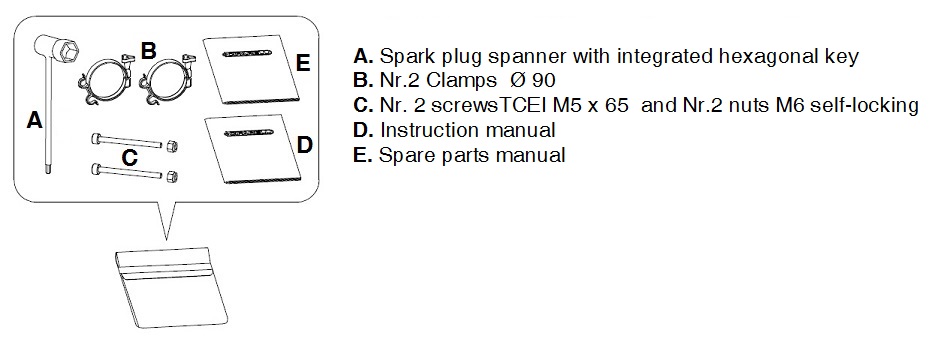
Now let’s see the sequence of operations to follow to install the BL1200 blower.
- Insert the elbow (1) into the fan covers (2) of the blower.
- Fix it with the two screws and the two nuts (C) that you found in the spanners bag, by using the hexagonal key (A), in the spanners bag too.
- Insert the two clamps (3) present in the spanners bag (B) at both ends of the flexible hose (4), without tighten them.
- Insert the flexible hose (4) on the elbow (1); tighten the knob of the clamp (3) on the left.
- Insert the throwing tube with swivel (5) on the flexible hose (4); tighten the knob of the clamp (3) on the right.
- Completely loosen the screw (by using the hexagonal key A) present under the blocking lever of the handle (6) and insert it on the throwing pipe (5); then with the blocking lever in low position (blocked), screw the screw without tightening to the end, but till to lock the handle on the pipe.
- Match the intermediate throwing pipe (7) with the throwing pipe with stive (5) through bayonet coupling.
- Match the final throwing pipe (8) with the intermediate throwing pipe (7) through bayonet coupling.
- Insert one of the two terminals (9) on the final throwing pipe (8) through bayonet coupling.
Your blower now is ready; we advise to assemble all the pipes;use of the pipes of the blower.
To work in a comfortable way with the blower, it is important to find the right position of the machine so that its weight is correctly balanced on the shoulders, especially if you are working on not smooth grounds. Once you have the blower on your shoulders, adjust the length of the shoulder straps so that the machine is placed close on both back and shoulders
The right position of the shoulder straps is shown on the panel A; pull the ribbon as in the panel B to tighten the shoulder straps; loosen the shoulder straps by lifting the buckle as shown in the panel C.
Even the position of the handle is important; adjust it, together with its inclination, without using any tool, lifting the blocking lever; slide the handle on the pipe and incline it as you like; at the end, lower the lever.
All this information, however, are described in the use and maintenance manual that you have found in the spanners bag which I warmly exhort you to read before using the machine.
Besides, prepare the mixture with the equipped bottle.
Now you are ready to use your new tool: good work!
_300x300.png)

_300x300.png)